How to build Machine Learning models that train themselves

In one of my recent posts, I covered how you can use TensorFlow Recommenders to create scalable recommender systems effortlessly. But how do we go from raw data to a trained model? What if we need to retrain the model? How can we keep track of, well, everything?
Orchestrating your Machine Learning experiments shouldn’t be a headache; and, honestly, it isn’t! Creating and deploying Machine Learning pipelines is not that complicated and its benefits are endless.
In this post, I’m going to cover how you can build your own pipelines and quite possibly over-engineer everything, just for fun. Ready?
Let’s start with containers. What are they?
Essentially, containers are a way to package your code, alongside all its dependencies, from Operating System versions to required frameworks and plugins. You can check my other post “Containers for Machine Learning”, to learn more about how to create custom containers.
You can think of it as a virtual environment that you can store and use wherever, where it doesn’t matter if your application was built with Python, R, or whichever dependencies it might have. Everything is containerized — everything is packaged together.
How can we create an image?
It’s quite simple, really! We can use Docker, which is the de facto tool for that task. All we have to do is specify all the steps we need to take to run our application. Just like so:
And that’s a Dockerfile!
We’re taking the example of the “Containers for Machine Learning” blog post, where we use a Python 3.8.6 image to download the data from a remote location and run the container_recs/train.py script with it.
Having the Dockerfile ready, we can just run to build and push our image to a remote artifact repository (just remember to set the $IMAGE_URI beforehand).
docker build . -t $IMAGE_URI
docker push $IMAGE_URI
And now we can pull our image in whichever environment we prefer and it’s guaranteed to work seamlessly! Cool, huh?
To run a container, you can just run:
docker run $IMAGE_URIThis will pull the image from the remote artifact repository, and run all the steps we defined in the Dockerfile. Couldn’t be simpler.
OK, but why did we do it?
Notice that, because we have a single container to take care of the training, we don’t need any extra parts. This way, we can have this container running on a schedule, so it gets models trained on more recent data, for example.
By having the training step containerized, we’re able to fit a Machine Learning model, regardless of the framework or language used, to data retrieved (in this case downloaded) from anywhere.
In fact, we could do whatever we felt like inside of this container, so we’re not really restrained to Machine Learning tasks, either! More, we can just take this image and run our container wherever we want to.
What about pipelines?
Now imagine you have a model deployed in production that classifies news articles. Over time, it’s highly likely that it becomes outdated — new terms pop in, old terms change meanings, you name it!
Think about it, how would a model that was trained on news from the 1920’s work on today’s news? How would it deal with terms like “blockchain” or “machine learning”? In fact, a news classifier would probably become outdated in a week, maybe in less time!
You see, having solely the training containerized only gets you so far. Ideally, we want a separate container to deal with each of the steps in our pipeline: preprocessing, training, deployment, etc.. Also, having our entire workflow orchestrated allows us to have much more control over the inputs and outputs of each pipeline step, and to debug things way faster when something goes wrong.
There are a lot of workflow orchestration tools out there, but today we’re going to focus on Kubeflow and, more specifically, Kubeflow Pipelines.
What is Kubeflow?
Kubeflow is an end-to-end Machine Learning platform built to work with Kubernetes. It allows us to orchestrate pipelines, have serverless inference endpoints, and many other features, and all you need is a Kubernetes cluster.
Anywhere you are running Kubernetes, you should be able to run Kubeflow.
It was originally developed by Google to basically give support to TensorFlow Extended (TFX) pipelines, but it has since become open-source and several organizations have contributed to it, making it quite powerful.
Although you can use Kubeflow for the entire Machine Learning workflow, its biggest feature is probably Kubeflow Pipelines (you can even install it as a standalone version), which is where our focus will be, today.
Now, because it just needs a Kubernetes cluster, you can deploy it virtually anywhere: on-prem, GCP, AWS, Azure, etc.. Which means that your pipelines can also be run in whichever environment you prefer! Is that cool or what?
Creating Custom Kubeflow Components
Now, Kubeflow Pipelines are made up of components —a step in your pipeline. These components are basically wrappers to containers where you basically specify an image, inputs and outputs, and override it with a command (for example, running a python script).
Normally, Kubeflow Pipelines Components are built using the kfp.v2.dsl.component decorator, which allows you to convert any Python function to a component, as shown in the documentation. However, although it takes more effort, I prefer to build everything from scratch, as it gives me more control over the components themselves.
Mind you, in practical terms, there’s really no difference between function-based components and the ones we’re experimenting with here. For me, it’s just a matter of personal taste or, rather, how you organize your code.
That being said, with Kubeflow, you can build everything from a single YAML file (as shown here) as long as you have your image ready. Take this example from one of my personal projects:
Let’s go step by step.
- First of all, we’re specifying the name of this component:
train - Then, we have the inputs. The first two inputs correspond to the training data and a
sklearn.base.TransformerMixin, dubbedfeat. The remaining inputs are pretty self-explanatory: the batch size, the number of epochs to train the model on and the optimizer’s learning rate. - Then comes the outputs. This particular component only has one output — the trained model.
- Now comes the fun part, the
implementation. In this case, we’re using a container for the implementation, so we specify that.
That container should be using thejoseprsm/rexify-trainpublicly available image, and run the command["python", "train.py"](which is the same as its entry point, but you have to specify it nonetheless).
Additionally, we can pass the arguments to the command, which, in this case, are the path for the training data and thefeatobject, the output path for the model, and input values for the training parameters.
And that’s it! We can then use this YAML file, to create our Kubeflow Pipeline components.
Our first Kubeflow Pipeline
To create a Kubeflow Pipeline, we should use the kfp.v2.dsl.pipeline decorator. The main arguments we have to supply are the pipeline’s name and pipeline_root (where to store the artifacts created during its runs).
So, our pipeline should look like something like this:
(Quick heads up: I’ve yet to find the implementation of load_component_from_file for kfp.v2, but v1‘s works well… for now.)
Essentially what we’re doing here is taking the YAML files for our components: download, preprocess and train, and we’re creating factory functions. When called with the right arguments, these factory functions construct ContainerOp objects, which work as the tasks in your pipeline.
In this example, we’re passing the output of the download_op (which may look something like this) to the preprocess_op, which expects the raw data as input, and it outputs the training data, alongside a feat object (you can see a similar implementation here). Finally, the train_op takes the training_data, the feat object and the number of epochs, as expected, and outputs (if everything runs correctly) the trained model.
The compiler really just compiles our pipeline_fn function, and creates a JSON file (pipeline.json) with our pipeline spec — containing all the information required to run the pipeline.
Moving on up!
One key benefit of Kubeflow Pipelines is that it’s fully compatible with Vertex AI, so we can run our pipelines straight out of the box. You see, Vertex AI runs on top of Kubeflow, which means you can/have to use the KFP (Kubeflow Pipelines) SDK to create your Vertex AI Pipelines.
Fortunately, since we already have our pipeline ready, all we need is to compile it is run:
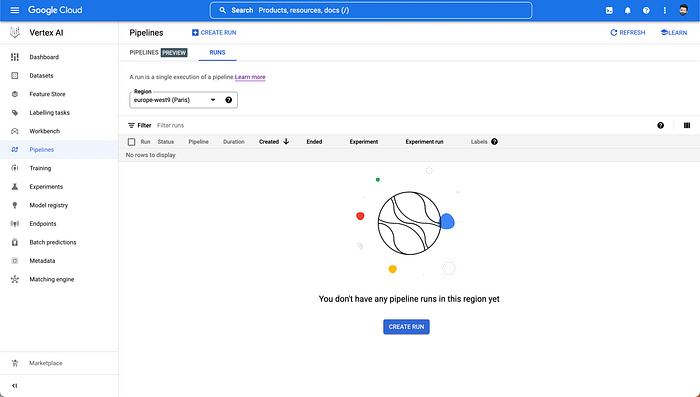
python pipeline.pyWe can now upload the resulting pipeline.json file to Vertex AI Pipelines. To do so, we first have to go to the Pipelines page. From there, click on “Create Run”.
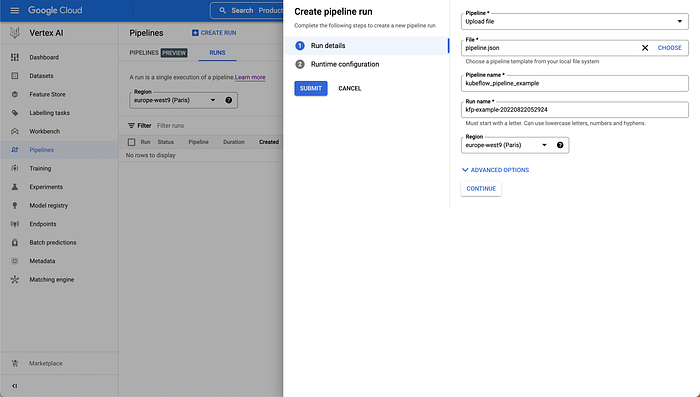
Now, under the “Pipeline” drop-down menu, select “Upload file”, and then submit the pipeline.json we just created. You’ll see that a lot of the fields were filled immediately, based on our pipeline parameters. If you want to, you can set a specific Service Account and VPC under “Advanced Options”.
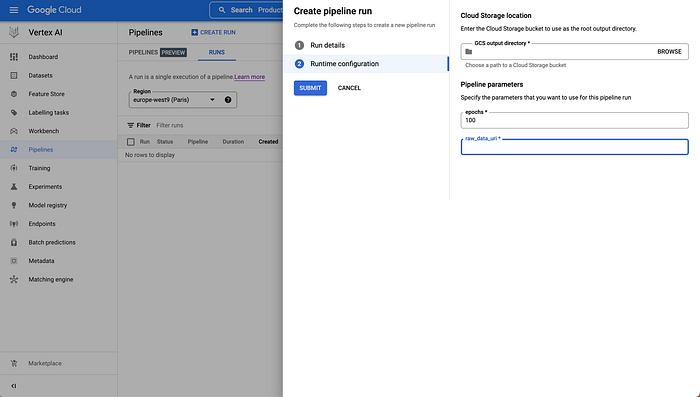
In the next step, “Runtime configuration” you’ll specify any Pipeline parameters your pipeline is expecting and the output directory of your run’s artifacts.
And that’s it!

You can also do everything programmatically, just follow the steps in the Vertex AI Pipelines documentation — it’s really simple, as well!
Conclusion
You’ve just mastered Kubeflow Pipelines!
We’ve just gone through how to build custom Kubeflow Pipeline components the hard way, and how to use custom containers with them. There’s still a lot to uncover, but try to build a small ML project with your own custom components. There’s really no other way to learn!
Feel free to drop a comment, or reach out if you have any questions!